Phone with Android 1.6 or above
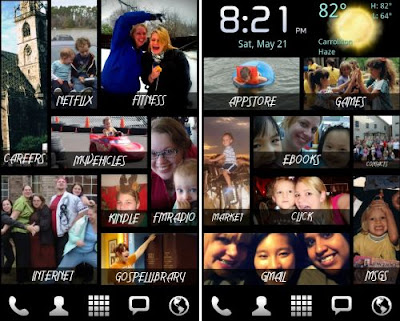
Launcher: I use the free Go Launcher EX, but it doesn’t have the same icons that the ADW Launcher EX or the Launcher Pro EX.
Desktop Visualizer Application from Android Market https://market.android.com/details?id=jp.co.bii.android.app.dskvzr&feature=search_result
Computer with XP SP2 or above
Gimp – Please download it from the following site and install http://gimp-win.sourceforge.net/stable.html. You only need to download the first file listed under ‘Base Packages’.
Photo file: Check here http://www.openstockphotography.org/
Additional Fonts: I liked http://www.fonts2u.com/aerovias-brasil-nf.font The site has a whole lot of fonts to choose from, so have fun. In Windows 7, you can install fonts by double clicking on the .ttf file and clicking on the ‘install’ button at the top of the page. This does not work in X though. Please click here for directions on installing fonts in XP. http://support.microsoft.com/kb/314960
STEPS
1. Open the folder with the photo you downloaded in it.
a.
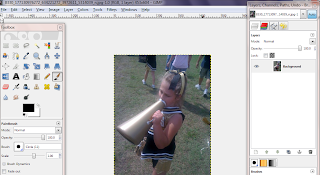
2. Add fonts to Gimp by clicking on the Text icon in the “Toolbox”. It’s an ‘A’. After opening the text tool, click on the Font list. There is a tiny icon and the bottom of the list in the right-hand corner.
a. There is a blue refresh icon in the center middle of the bar at the bottom of the list. The adds the new font to the Gimp font list so you can use it in the future.
3. You need to know the size of the icon you need. This refers to the number of pixels. For example, the follow list is the size of icons for a 480x800 phone based on the list found here. http://androidforums.com/android-themes/199936-android-phone-7-theme.html I need a 1x3 icon for Craigslist Mobile.
1x1: 110 x 125
1x2: 110 x 260
1x3: 110 x 395
1x4: 110 x 530
2x1: 230 x 125
2x2: 230 x 260
3x1: 350 x 125
3x3: 350 x 395
4x1: 470 x 125
4x4: 470 x 530
4. My image is natively 453x604 pixels and since the I want to use most of the image, and the size of the image needs to be 350x125. I scaled the photo back to 296x395.
5. To scale images, you need to click on ‘Image’ to open the Image menu and scroll down to ‘scale image…’
6. To maintain proportions make sure the icon to the right of the pixels numbers is a connected image. If you click on it, the icon will change and look like the original icon has a disconnect in the middle. Do not use this when you are scaling the image.
7. After the image has been resized, you may want to zoom in by clicking on the ‘View’ option and scrolling down to the ‘Zoom’ option. I usually set it to 200% after scaling the image.
8. Next we need to set the canvas size. This will be the final size of the icon. This is when I set the image size to 350x125. Don’t forget to click on the icon to the right because otherwise it will automatically change the size to maintain the aspect ratio. This is unimportant at this stage.
9. Click ‘Resize’ at the bottom of the bottom of the ‘Set Image Canvas Size’ popup menu.
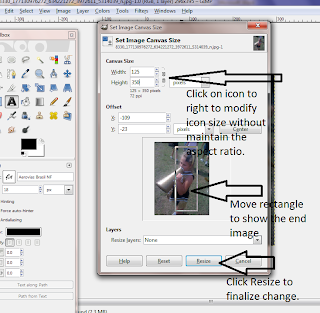
10. If you need to adjust the image, you still can by clicking and dragging within the dashed lines.
11. Now we need to add a layer to the image by going to the ‘Layer’ menu at the top and clicking on ‘New Layer’
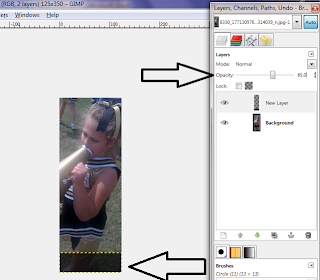
a. You should make sure that the default background color is white and the foreground color is white.
b.
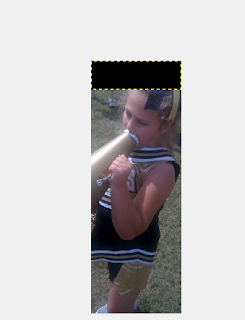
12. To keep things consistent, every icon you make should have the same height for the second layer. Please also click on ‘Foreground color’ and the second number box (refers to height in pixels) should be changed to 40.
13. It defaults to adding the second layer to the top of the image. I move it to
the bottom of the image and change the ‘Opacity’ to 65% under the ‘Layers, Channels, Path, Undo, …” Menu. I do so by either moving the slider or you can click on the number to the right and type in 65.0.
14. Now we can add the text. I installed Aerovias Brasil NF. Click on the ‘A’ icon to open the text menu in the Toolbox.

15. My font size is 30 and the color is white. You can change the font color by clicking on the box below Text.
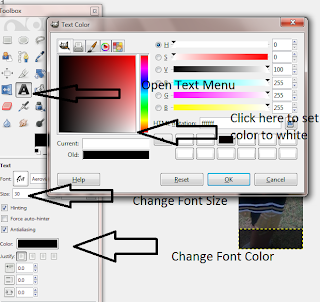
16. Click within the black shaded area(second layer) and type in the name of your icon. I used ‘Craigslist’. My is also completely capitalized, but that is a style choice you have to make.
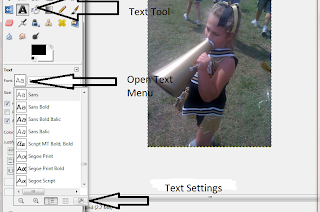 17. You will probably need to reposition the text to make sure it’s where you want it to be in layer 2. I like to center mine. You need to click on the ‘Move’ menu in the toolbox. You can also access the option by opening the ‘Tools’ menu and clicking on ‘Transform Tools’ and then click on ‘Move’
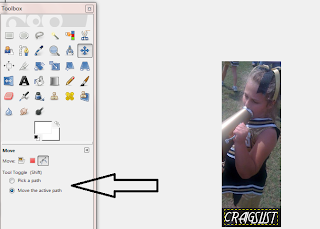
18. Click on ‘Move the Active Layer’ to move the text where you want it within the box.
19. Your file is now complete and you can save it. It needs to be saved in png format. Click on ‘File’ at the top and click on ‘Save As’
20. It will now ask you to change the save name. You can delete everything within the save name box and write the filename dot PNG. For example, mine is called craigslist 1x3.png. This saves it as a PNG file. You will then be asked to flatten the image and I just click on “Export” and then save and leave everything on default..


 My 2 dogs :) despite the evil eyes, are awesome.